Hello once again gamers and welcome to my website, if this is your first time in here! I am Chester and today we will be talking about on how to play Minecraft with friends.
You can choose whoever you want to bring to your server. Yes, you will need one for it to work. But don’t worry, today I am going to explain step-by-step on how you can create a server where everyone you want can join and have lots of fun together, so stay tuned!
First of all, you can buy a server hosting, where someone else will be allocating it. In this way you will be playing not only with your friends but with strangers too. This will be for another post. This way that I am going to show you on this post, you control your own server and also the people that come in it, your beloved friends (or family)!
Also, you will need Minecraft Java Edition, because this method only works on it, for example Minecraft Windows 10 Edition it’s completely different. I will explain later on the post about Windows 10 Edition and how you can play with your friends there.
This last one is much better and easier if you want to play with 4 (or less) people. If that is the case jump on to Windows 10 Edition Walk-through almost at the end of this post. Thanks!
In my previous post (here is the link) I showed you that there is a website where you can get your Minecraft Java and Windows 10 Editions cheaper than usually! Isn’t that great people? (skip this step if you already purchased Minecraft before!)
So, if you don’t have any Minecraft edition and want to buy it, access the link above for more information about the two editions.
If, you purchased Java Edition, that is a great choice! Now you can redeem your key that you bought. Click on this website to do so. It will bring you to the official website of Minecraft where you can create a Mojang account that you will need to have your login session, verify your e-mail, redeem your key code that you just purchased and download the Minecraft itself!
After you finish downloading, just install the game, it will open the Minecraft launcher after. Login to your account that you just created and you are good to go!
Let’s Start Creating Our Multiplayer Server, Shall We?

Okay guys (and girls), now that you have Minecraft Java Edition, you can choose which version you want to play. To do this go to your Minecraft Launcher and click on installations, like you see on the image above. After, click on “New…”. And you can select the version you want to play and where you want to the game directory to be.
There are more options too. One of them is to download the server of the version you are playing with, so click next to the version, on the right side where it’s written “Server”. It will download the server.jar to your PC. When you are finished just click on create. Don’t forget to give it a name so lately you will know which version you are playing!
One more thing you can do there, is to allocate more RAM to your server. This, is a way for you and your friend’s games don’t “lag”. To do that you will need to go to your installations again, then click on the current release version you want to create the server. Click on “More Options” and then you will find where it’s written “JVM arguments”.
You will then need to change some code that is in there.
You will have something like this: “-Xmx2G -XX:+UnlockExperimentalVMOptions”. This means that your server will be running with 2 GB of your own computer.
“How much RAM should I have to run on Minecraft”, you ask? Well if you’re playing without any mods or just a few, 4 to 6 GB of RAM would be enough but if you ‘re adding some more mods you will need at least 8 GB. Just change the “-Xmx2G -XX” to the number you desire, for example: “-Xmx6G -XX” then press save and you’re good to go!
Also, try not to use more than half of you computer’s memory on the server, because you will need it for other things like running the game.
This means that you will need a good computer to host the server, but if you don’t have one, you can ask if some of your friends has one and he can host the server for you.
Well, after this is done, create a folder on the desktop and name it the version you are playing with so you know it’s the correct one, for example: “Minecraft 1.12.2 Server”. Then, get the server that you downloaded to your PC that is probably on the “downloads” file and drag it to the folder you created on the desktop!
Now, to create the server, just click on “server.jar” twice for it to open. It will download some files, like “eula.txt”, “server.properties” and more. Open the EULA file and change the part where it says false to true if you agree with their terms.
Click once again on the server.jar and let it run until it reaches 100%. Let it finish, and then just write stop on the command line in the right bottom.
And it’s done! You created your server! And next, I will show you on how you can play on your new awesome server! Oh and your friends too. Stay tuned!
“Okay I Created The Server, Now What Do I Do?”
Okay, if you have created the server successfully, congratulations!
But if you had any sort of problem so far, just comment down below and I will be happy to help you out!
Now, there is a way to test if everything is going alright so far. Go to start and write “Command Prompt”, click on the right on it and click “Run as Administrator”. It will open a “dark window” where you can write a lot of commands to your PC. But you only need to write “ipconfig”. It will open something like this:
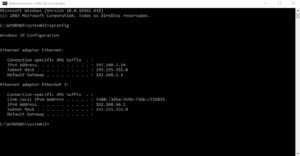
First, you will need to know your IPV4 address so you can see if you are able to join your Minecraft server. You can find it after typing “ipconfig”, as you can see above. Select it, and copy it (CTRL + C). Please Don’t close the Command Prompt yet!
After this, go to your folder, where you created your server, search for the text file “server.properties” and open it. You will then find a text: “server-ip=”, paste the IPV4 address (CTRL + V) that you just copied, after the text and save the file.
You can now test if the server is working for you!
Open Minecraft Java Edition (go to my previous post if you still don’t have Minecraft) and click on Play. After the game is open, go to Multiplayer and click on Direct Connect. It will ask you for a Server Address, which will be your IPV4 address again. Go to command prompt and copy it again, then paste it on Minecraft.
Hopefully everything was alright and you are inside of your server and your new world playing Minecraft! If not, just comment down below so I can help you.
Port Forwarding “The Hardest” Part!
Don’t be scared! it’s not that hard. So if you are able to join your own server, now you want to bring your friends right?
But first, you will need to Port Forwarding so your friends can find your server! I will explain better what is Port Forwarding in the future but for now just know that is a way for you, to be able to connect with your friends’s IP address.
How to do it, you ask? If you still have your Command Prompt open, go there, copy “The Default Gateway”, like you did with your IPV4 address and paste it on your browser. If you already close the Command Prompt, just follow the instructions again on how to open it. Don’t forget to click on “Run as Administrator”!
So now that you pasted your default gateway on your browser, you will see a page that is asking you to login and it’s asking for a password.
You should type “admin” for the login name, and “admin” for the password. This will only work if you didn’t change your password or login name before. If you did change it just type the modified name and password, that only you know.
Then, look for an option inside that looks like mine:
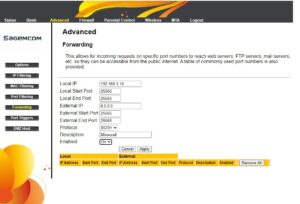
As you can see, you will need to find an option where it’s written “Forwarding” or “Port Forwarding”. Probably you’re seeing something different from mine, but don’t worry it’s normal because there are a lot of different router companies. So probably you have a different page that I have.
Just try to find on “advanced” or something similar that I have on the image above. Don’t panic if you didn’t find it right away just take your time.
Found it? Great! Now you need to configure it so your friends can join.
Now this is probably different from yours also, so try to see something that asks you for ports and your IP address.
When you find it, if it asks for your IP, copy your IPV4 address for the “Command Prompt” and paste it there. If it’s asking you also from ports, or internal / external ports write this number on it: 25565. In the protocol you need to select the option “Both” or “TCP/UDP”.
And on description you can write “Minecraft” so you can remember for what did you do the Port Forwarding. If it asks you for a Public IP, just write on your search engine “my public IP” and you will see a number. Copy that number and paste it on your router’s page (on Port Forwarding). Don’t forget to activate and save it as well!
On your server’s properties you should have also the same number on server port (you should have something like this “server-port=25565”). If you have you are good to continue.
If you have done everything correct, your friends can now join the game! Yay! But how do they do that?
Warning: For your friends to be able to play with you, you will need to give them your Public IP Address. You will find by searching it in google, like I explained above. DO NOT share your public IP with anyone you don’t know because they can know your location and it can be dangerous! Just give it to your trusted friends and family okay?
After you give them your Public IP, they need to launch Minecraft Java Edition, go to Multiplayer, click on Add server, Give the server a name of their choice and paste on “Server Address”, your public IP Address.
And finally it’s done! They now can join your server and you can play together!
“That Was A Lot Of Work! What About Windows 10 Edition?”
Minecraft Windows 10 Edition is a lot easier to play with your friends (up to 4)! You just need to join the world and invite them through the Minecraft it self.
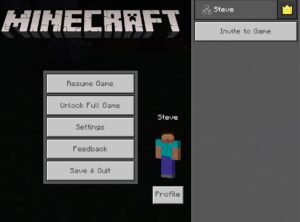
As you can see in the image above, you can invite friends to play in your world by clicking on “Invite to Game“. You will need to add them first on the menu, after you click on “Play” and then go to friends.
There are a few disadvantages. One of them is that you can only invite up to four people on your local network which means if you have more friends to add, you can’t.
But the biggest disadvantage is that everyone you invite will need to buy (including you) the Minecraft Windows 10 Edition.
Well it’s not so different for Minecraft Java Edition though, because everyone will also need to buy the game, but at least you can create servers so everyone you want will join.
Nonetheless, you can also create servers on Minecraft Windows 10 Edition but not without paying for them.
I mean, it’s easier to play with just a few friends, but if you want a bigger community to join you, I recommend trying with the “complicated” way with Minecraft Java Edition.
If you want either the Java version or even the Windows 10 Version of Minecraft please go to my previous post, here!
It will contain not only how to obtain Minecraft cheaper but a little tutorial on how to play the game!
Conclusion!
For our final thoughts I really have to say that, personally, I have been playing a lot more Minecraft Java Edition and I have enjoying it a lot more with friends and family, with the method that I showed you!
I really want to make another post of Minecraft about server hosting that you can buy and how you can benefit from it, but to have a “free” way to do it is quite nice right?
I have a couple of ideas of what to post in the future for you gamers, but I will not spoil it yet! I also, have to do a walk-through of Half-Life 2 Episode 2, but this is for another post!
So, if you have any doubts and I believe you will have, because it is a bit difficult to create a Minecraft Server, comment down below. I really want to help you! Any kind of doubt, really.
Without further ado, I will say goodbye and “see ya” in the next post!
Chester


Great site mate very informative keep up the great work, I look forward to whats to come
Thank you so much! I’m currently working on a new post! I will update it soon…
Chester